Please see the instructions below for uploading from Sage Intacct from our partner, Validis.
Before uploading your data, please ensure that the following pre-requisite are in place:
1. You must have Top level administrator access within the Sage Intacct portal.
2. You must have Multi-base currencies enabled if using multi-base currencies.
(To verify this, go to Company > Subscriptions >Multi Entity Console > select Configure > View Enable multiple base currencies)
Task 1: Enable Web Services XML Gateway
Task 2: Create Web Service User
Enable Web Services XML Gateway
1. Sign on to Intacct
2. Select Company > Admin > Subscriptions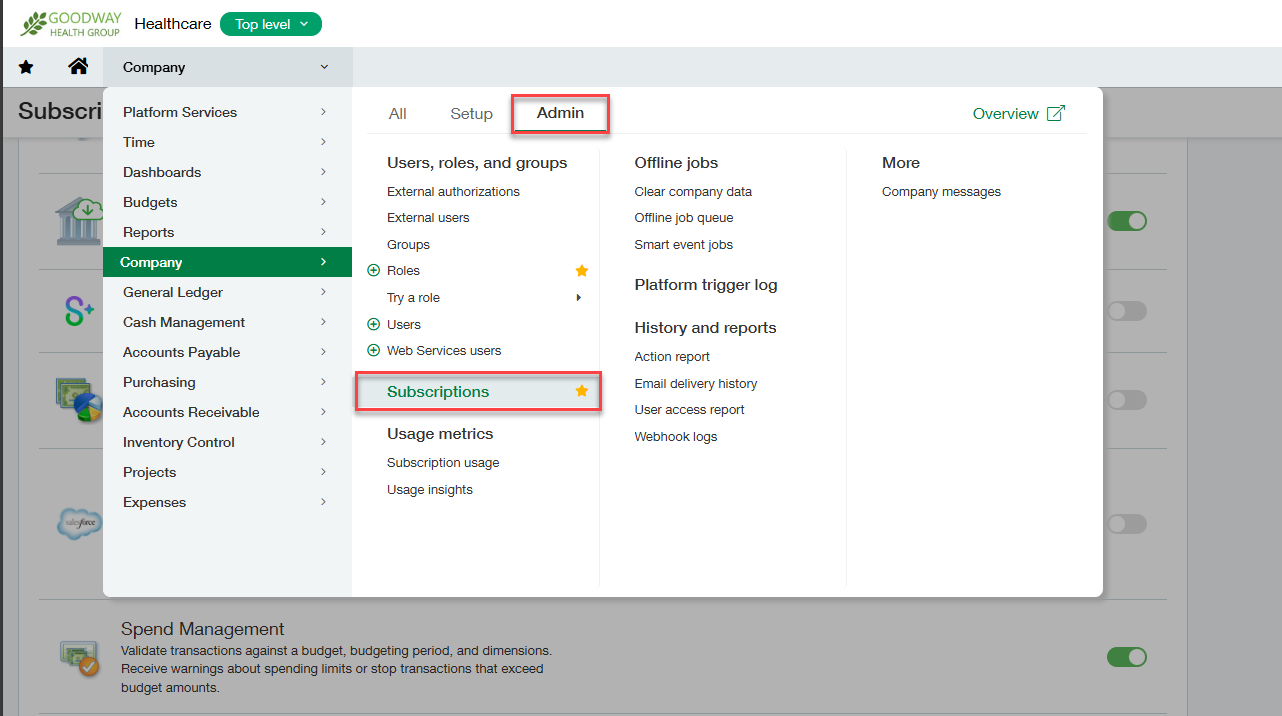
3. Enable Web Services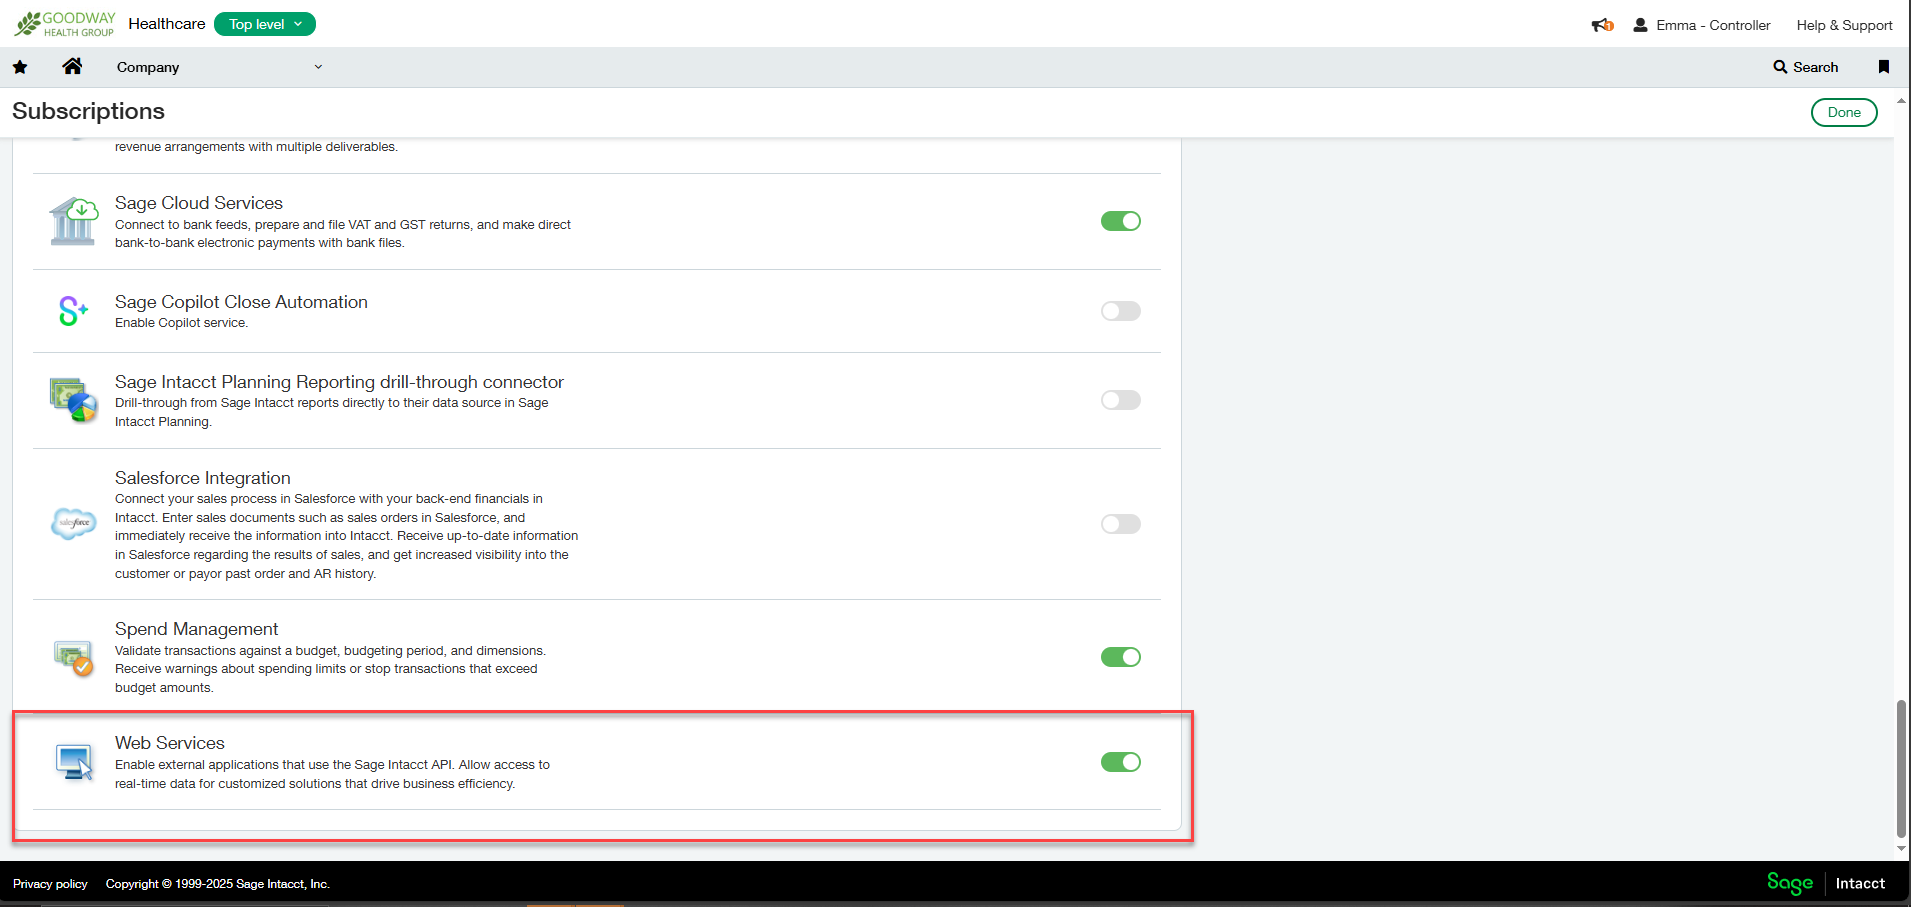
Create Web Service User
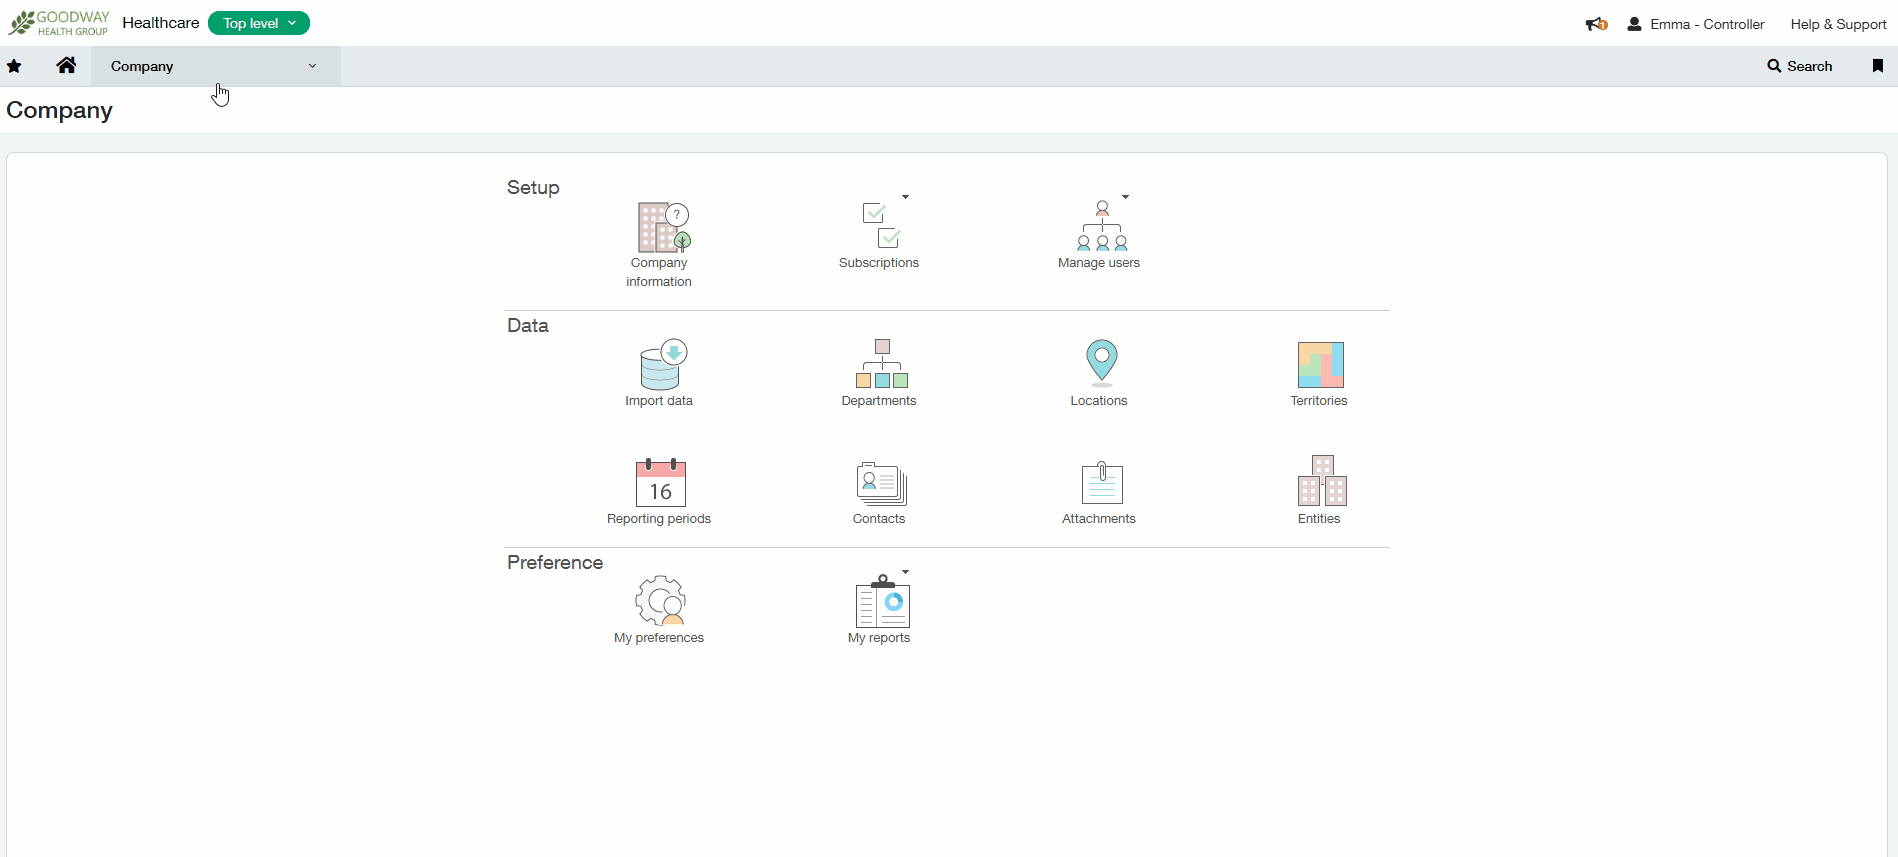
1. Go to Company / Admin / Web Service Users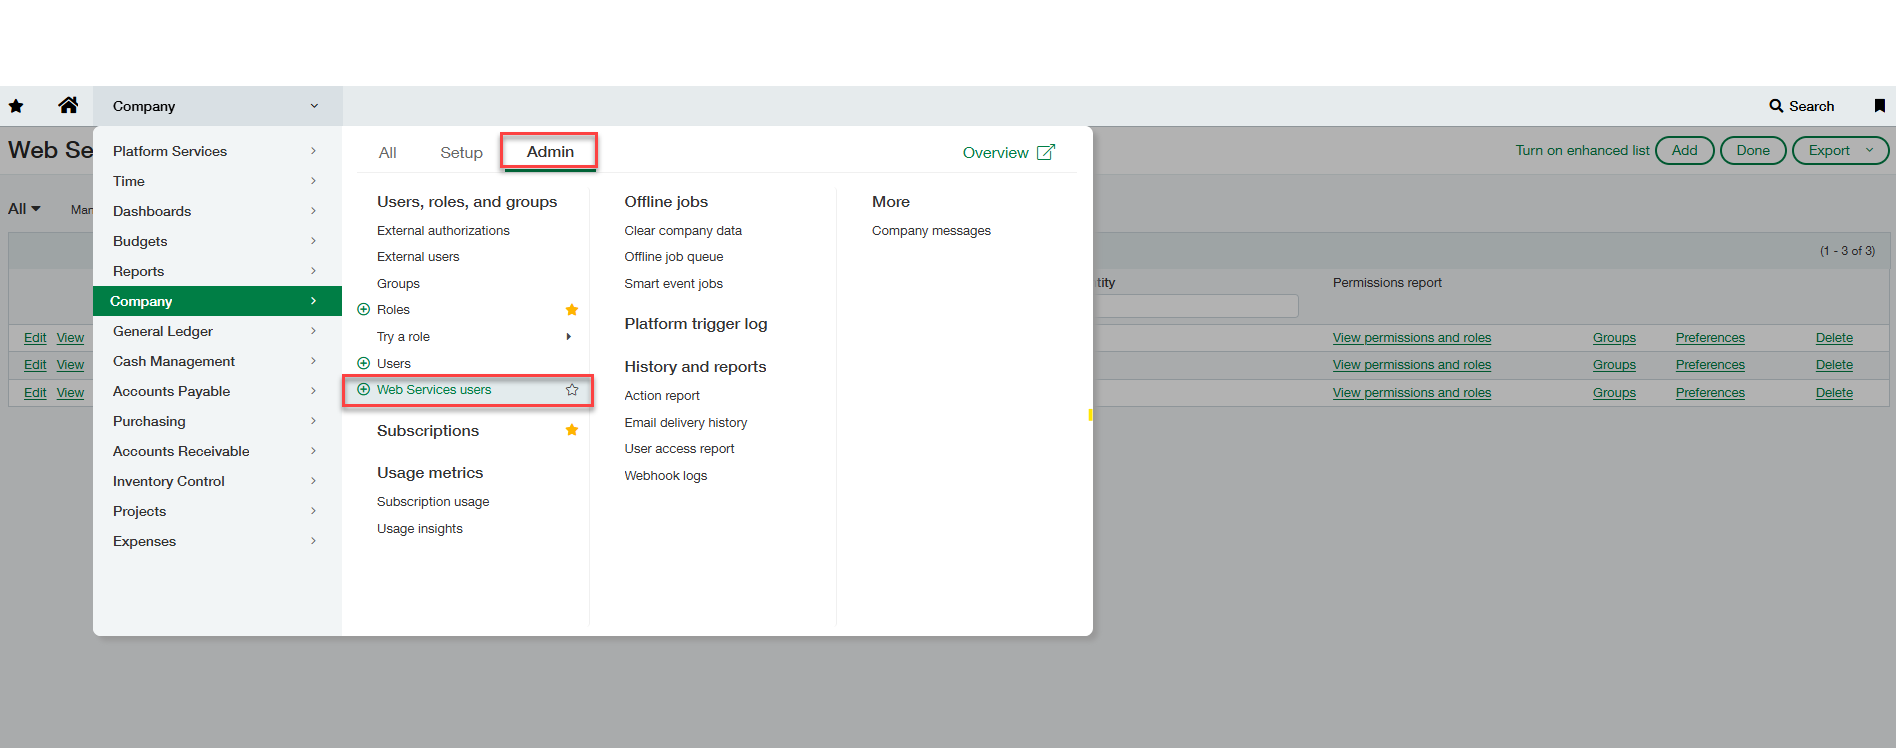
2. Create User With Limited Admin Privilege
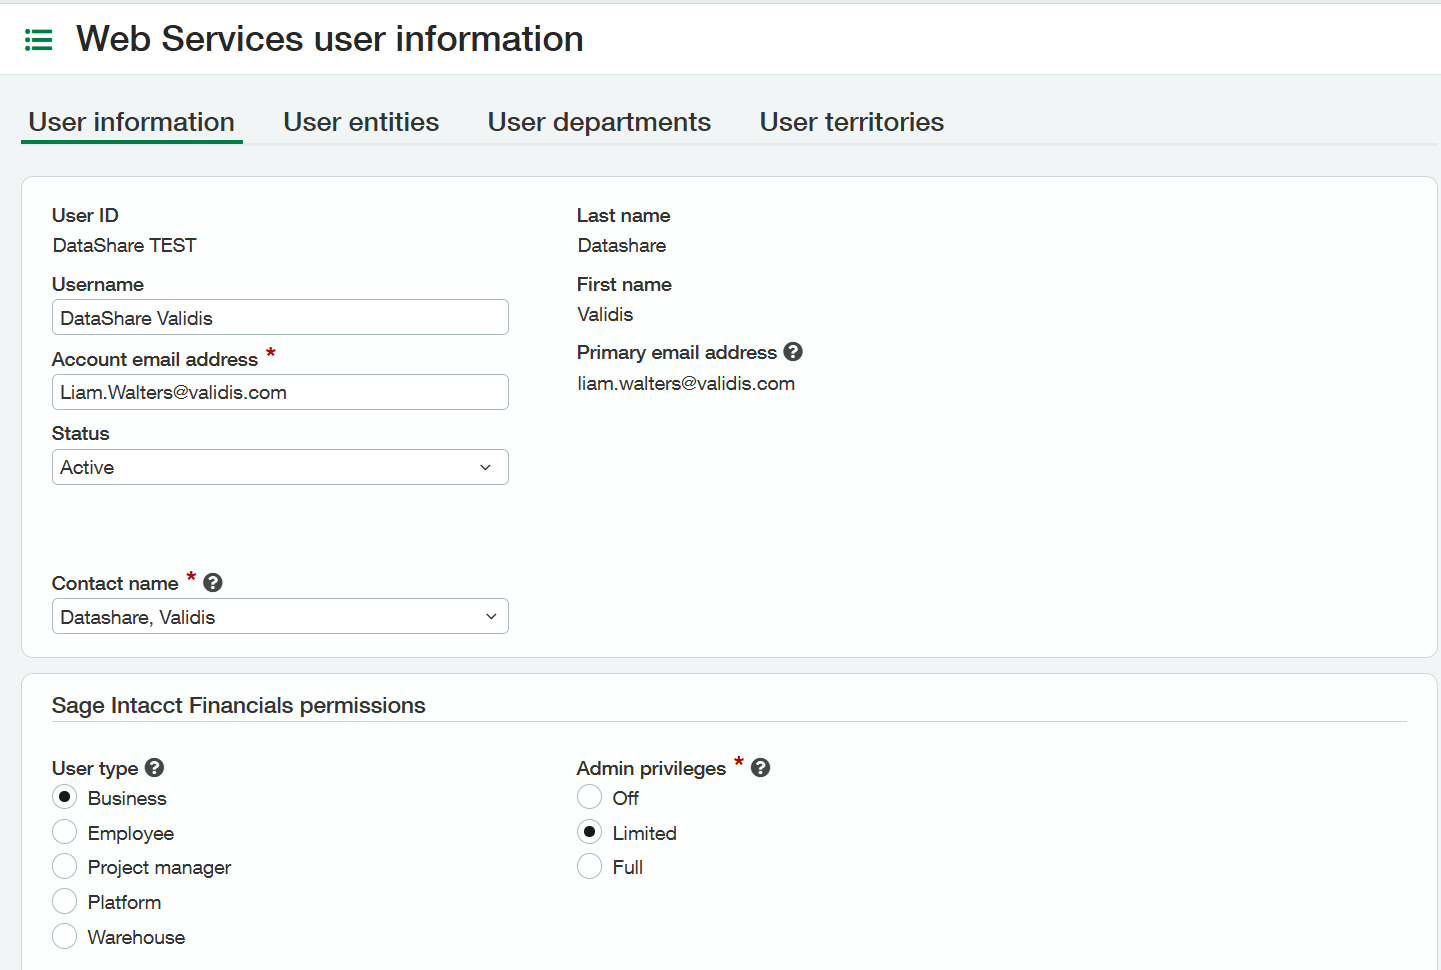
When creating the User, all fields must be added (User ID, Last and First name, Email address, Contact name, User name, User Type, Admin privileges, and Status):
- User ID: DataShare
- User name: DataShare Validis
- Account Email address: <Your email address> (Once the User has been created, Sage Intacct will send brand new credentials, which you will need to use to upload your Sage Intacct data)
- Status: Active
- User type: Business
- Admin privileges: Limited
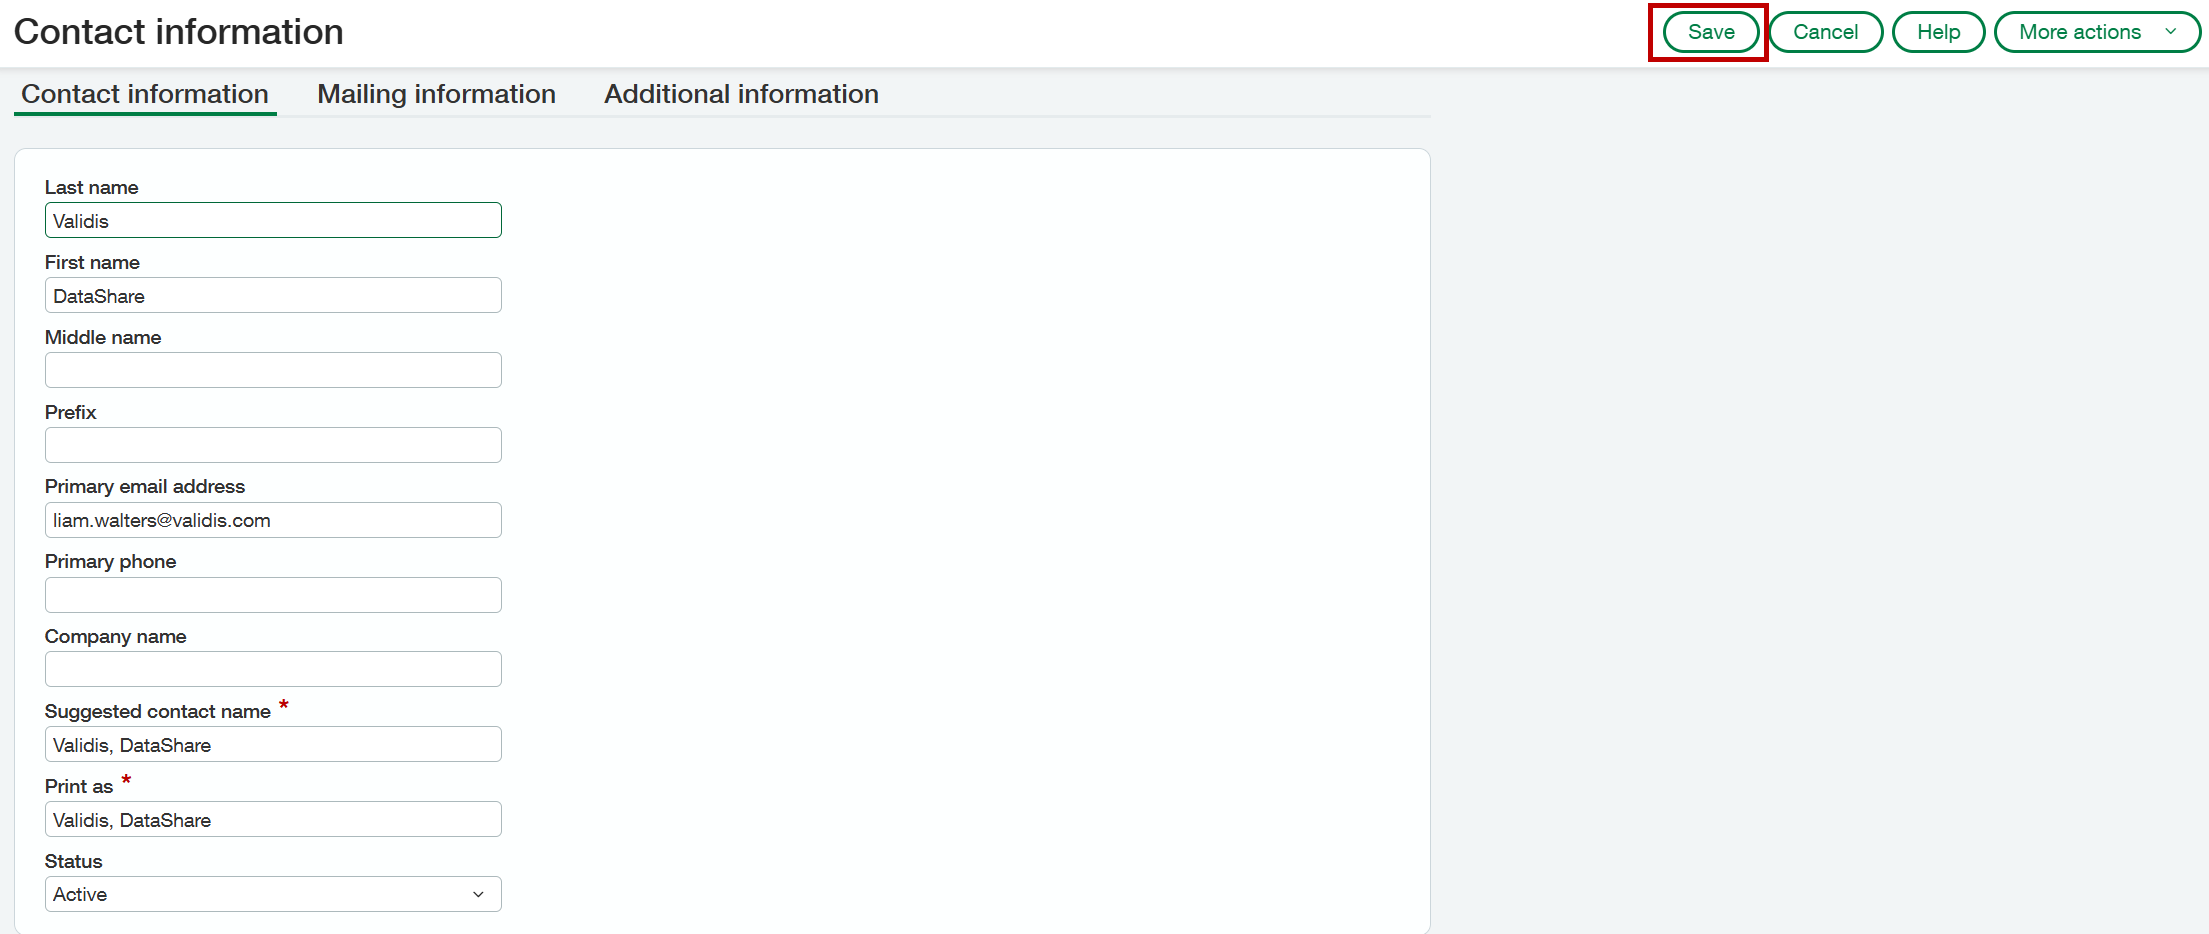
You will also need to add a new contact name
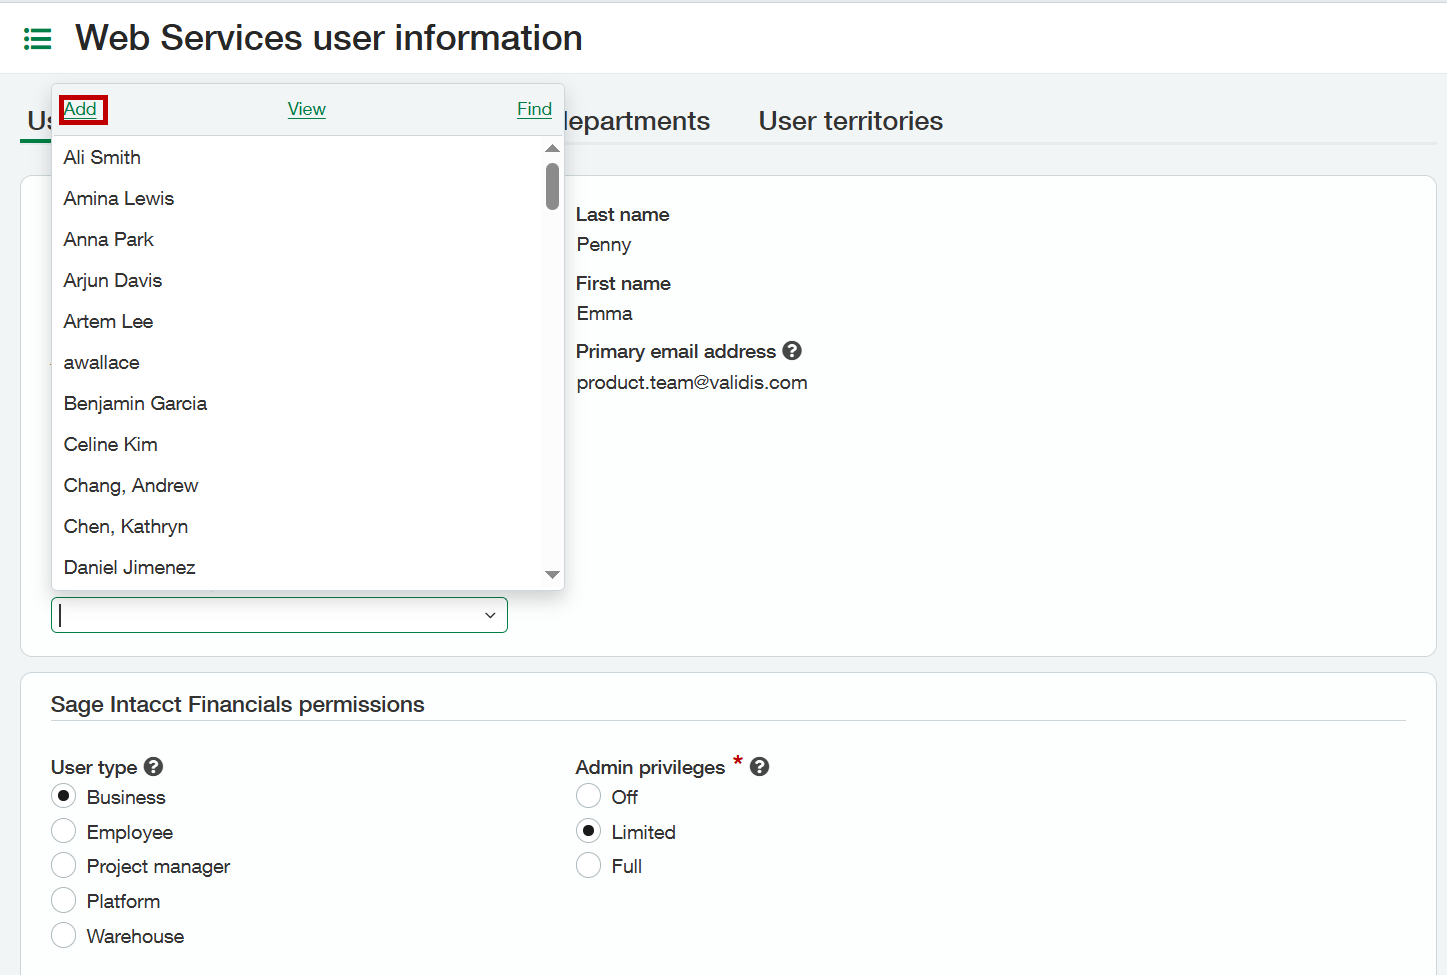
The details of the user are below:
- Last Name: Validis
- First Name: Datashare
- Primary email address: <your email>
Once you have added the details, click Save
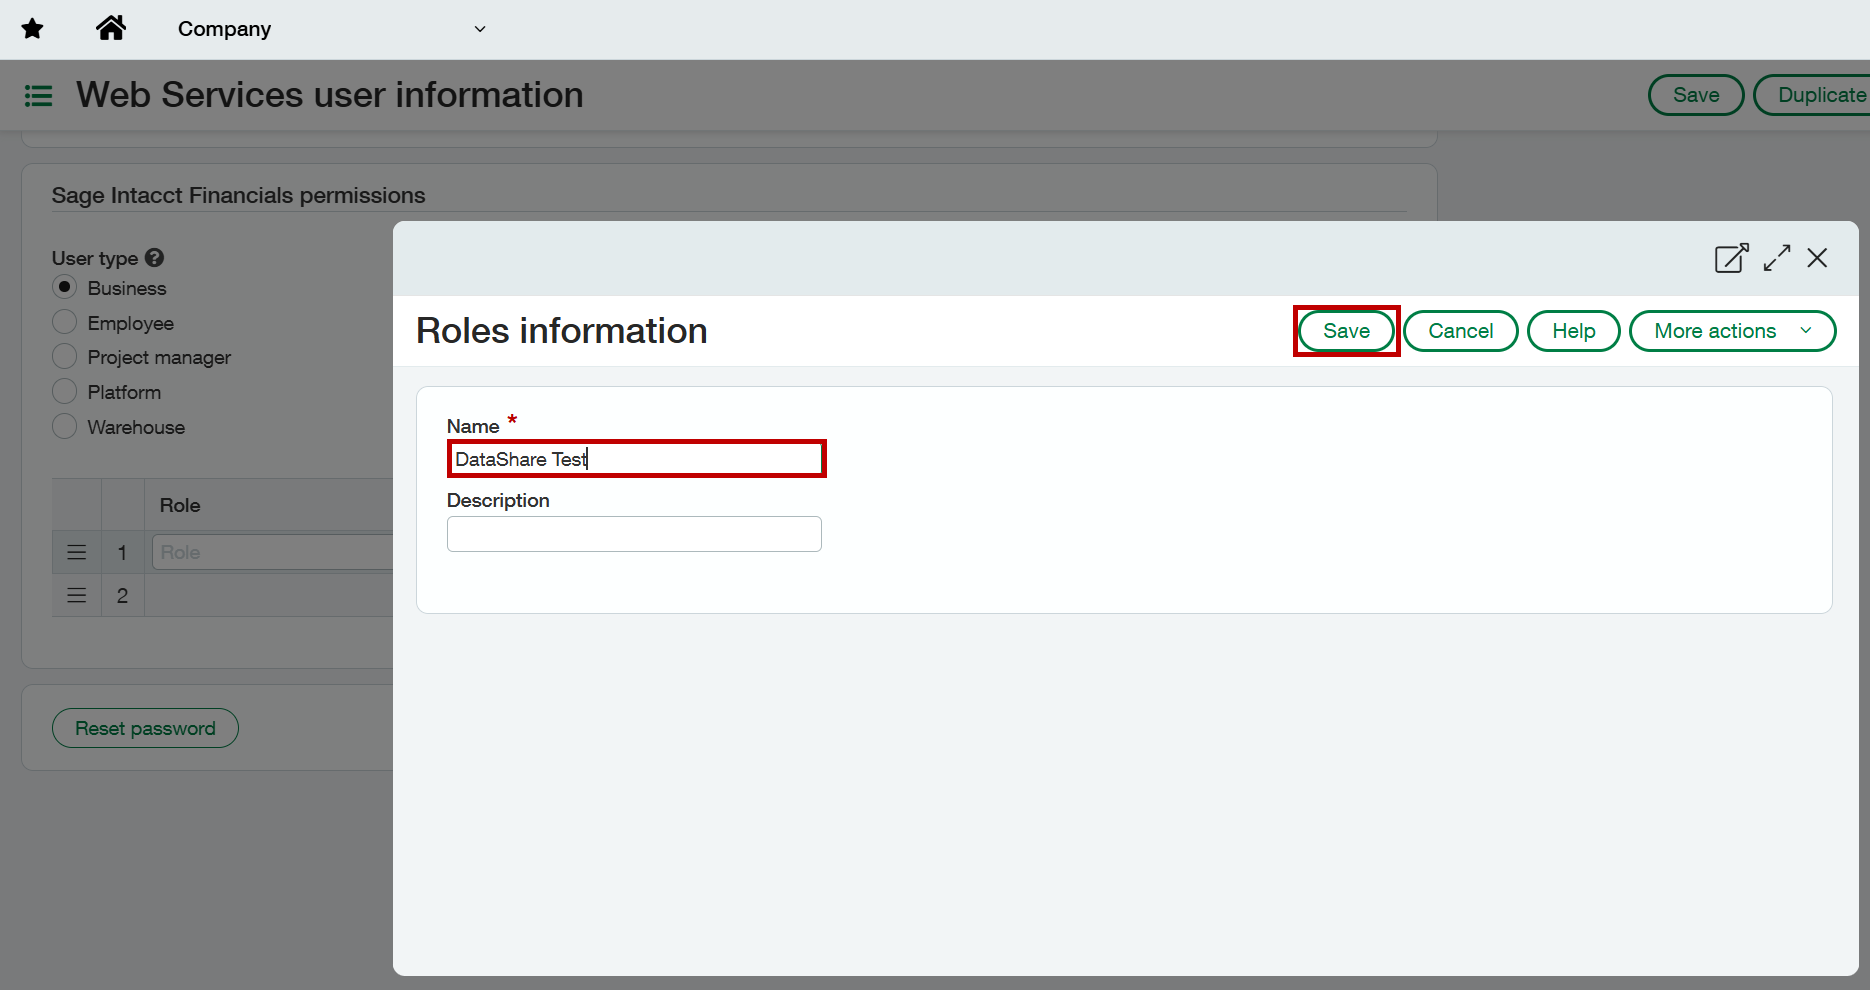
Finally, you will need to add a new role. Navigate to the Role Section, click the dropdown and click add
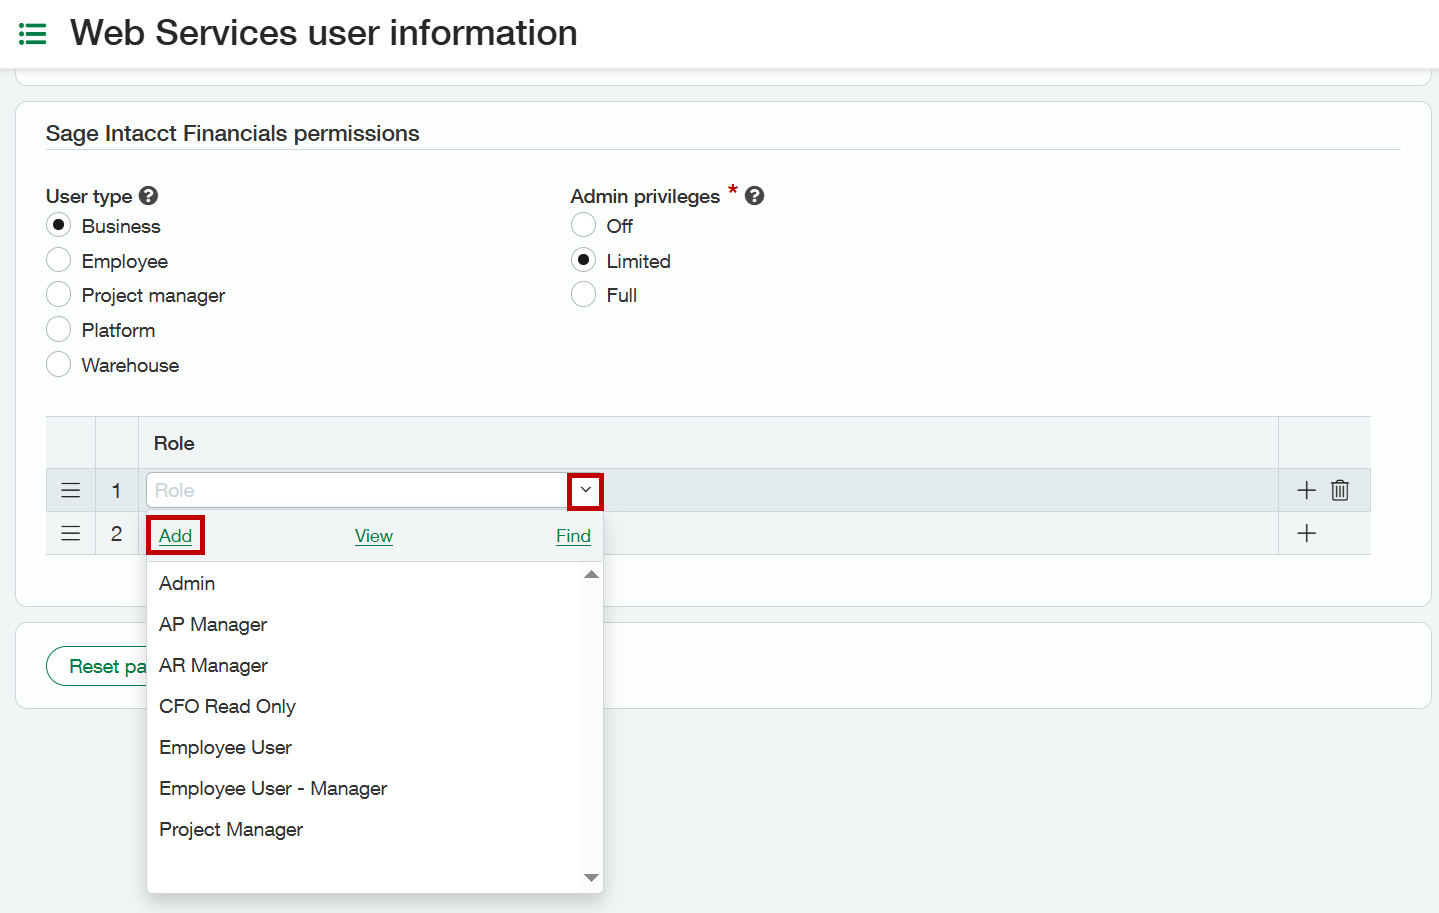
You can call this role what you like. Once you have entered the name, click Save
All the files have now been added--click on Save. The web user has been setup. No information will be added for Role/User entities/User Department/User territories.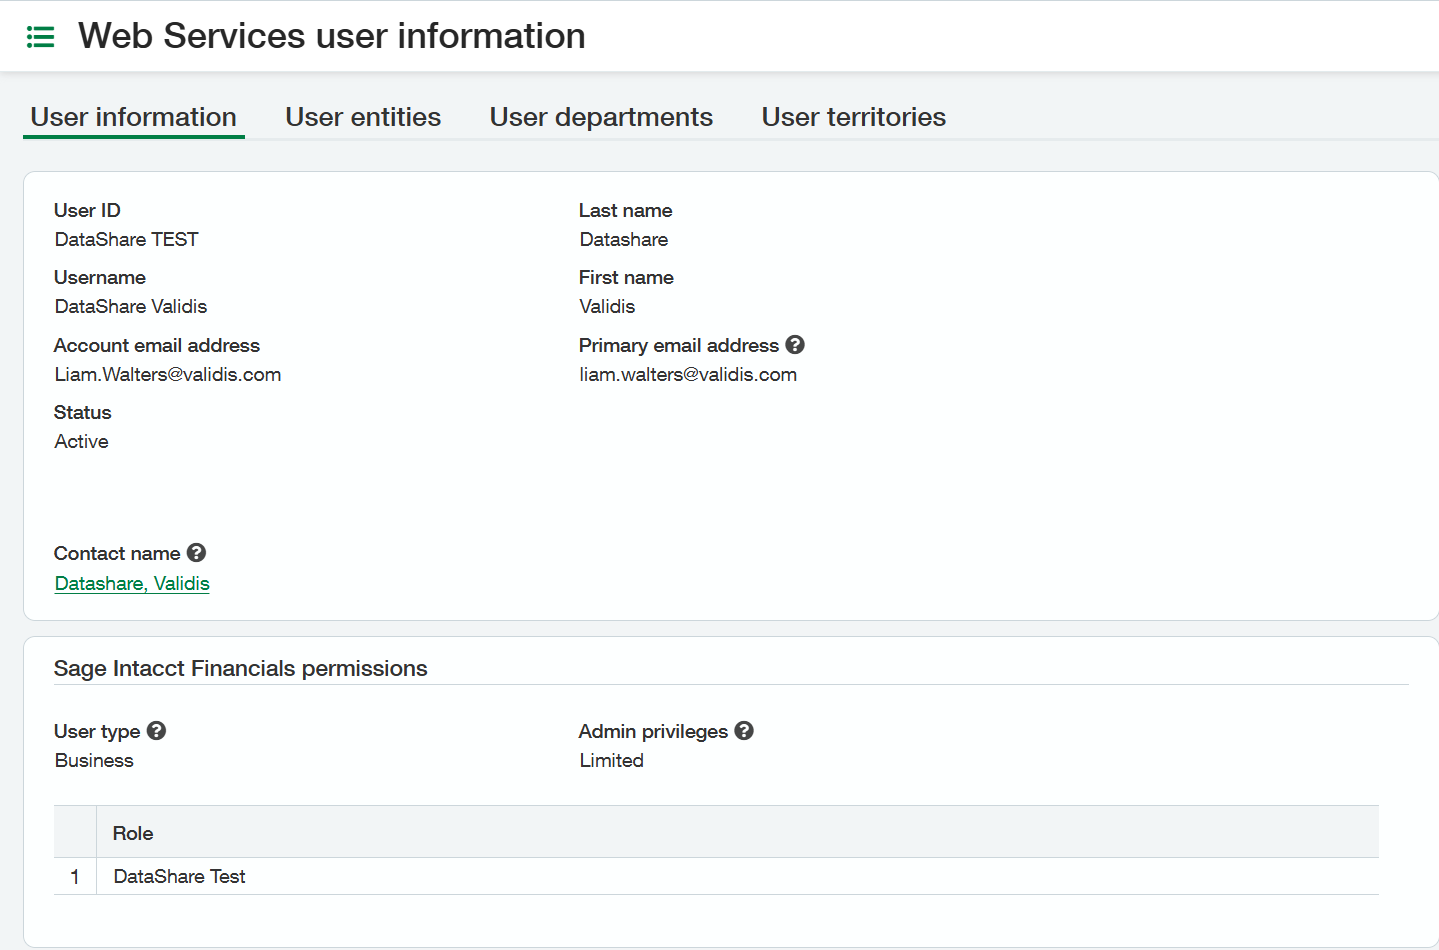
3. Set Up Permissions
Go to Company/Admin/Web Service Users. While on the Permissions and Roles Report, go to Roles>Admin.
Depending on whether the company is set-up for role or user based permissions, the exact route to granting the correct permissions will vary slightly. If only role based permissions are set-up then a role with the correct permissions must be assigned. If user permissions are set-up then the user is amended directly - either way the subscription settings should be set to 'All' on the following modules (whether this is against the user or the role):
- Administration
- Company
- General Ledger
- Accounts Payable
- Accounts Receivable
- Cash Management
*Note: Due to Sage Inacct requirements the "Edit" access is required for certain permissions to enable a successful extract. Rest assured Validis accesses data in a read-only method and never edits data in the native accounting package.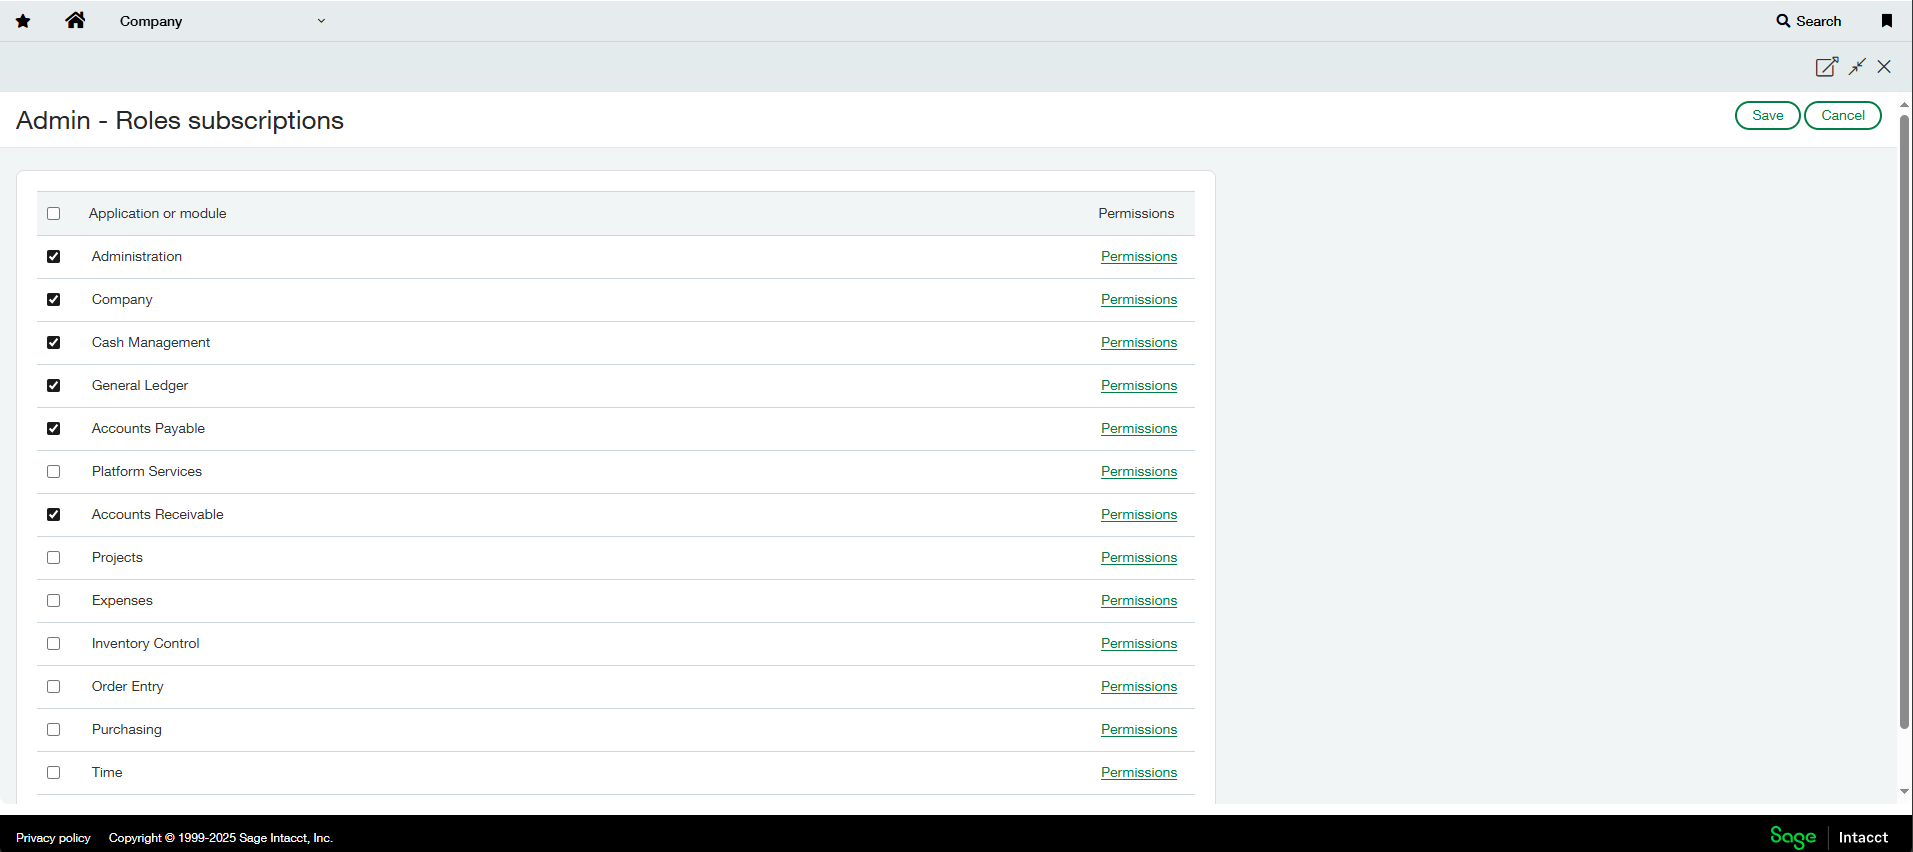
Under Administration select All permissions, then Disbale the following--
- Application Subscriptions- Subscribe, Configure, Remove, Assign Users
- Grant Admin Rights-Grant
- Messages-Add, Edit, Delete
- Users-Add, Edit, Delete, Permissions, Impersonate
- External Authorizations-Add, Edit, Delete
- Clients-Add, Edit
- Templates-Add, Edit, Delete
- Cancel Service-Run
- Access Log-Run
- Audit Log-Run

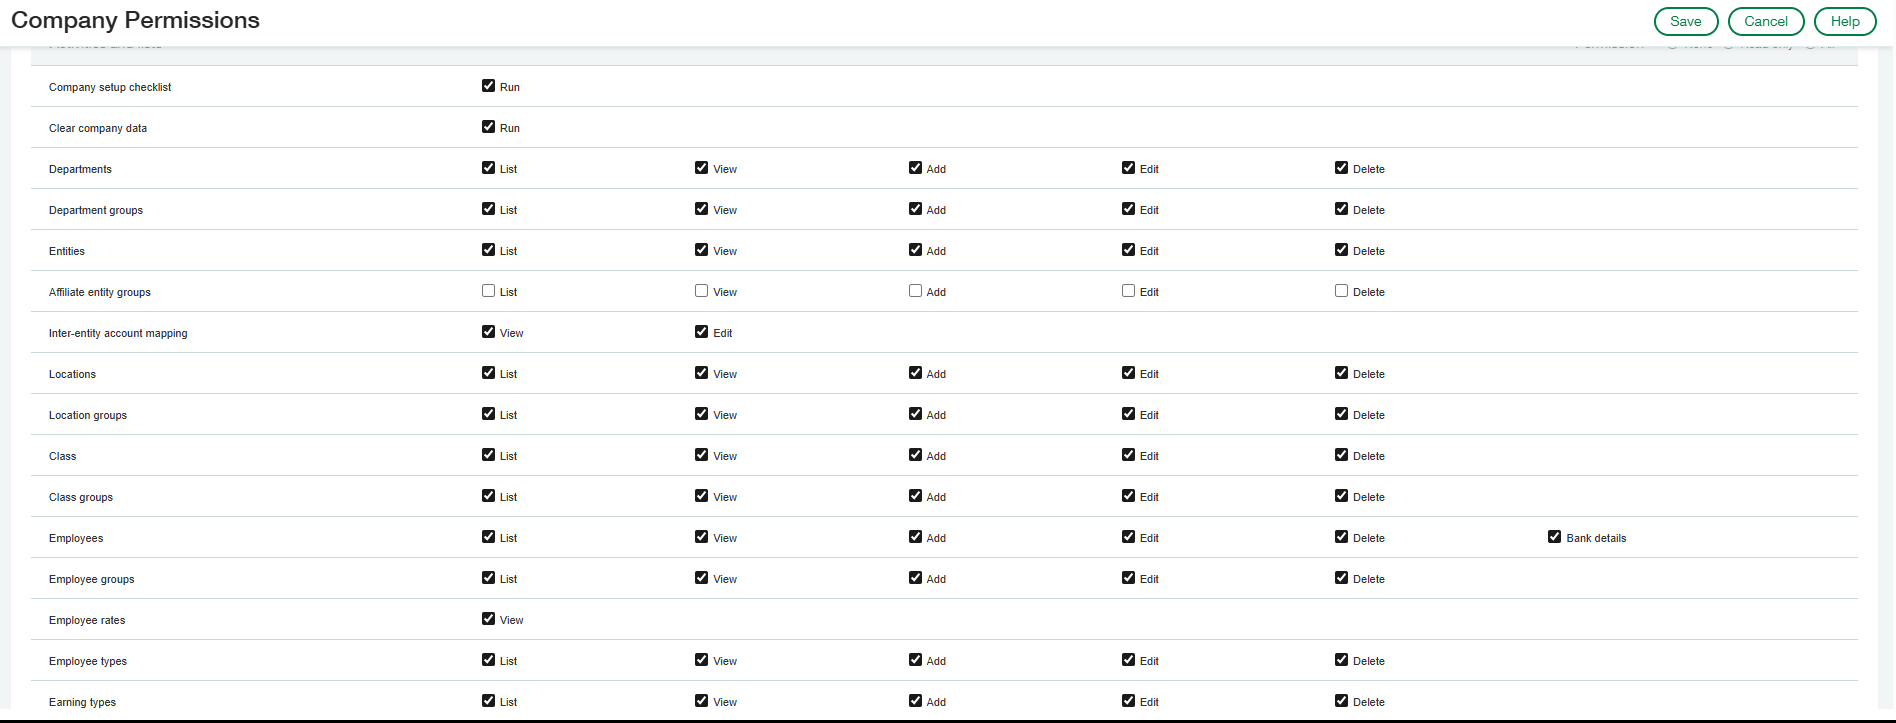
Under Company select All permissions then Disable the following:
Affiliate entity groups - List, View, Add, Edit, Delete
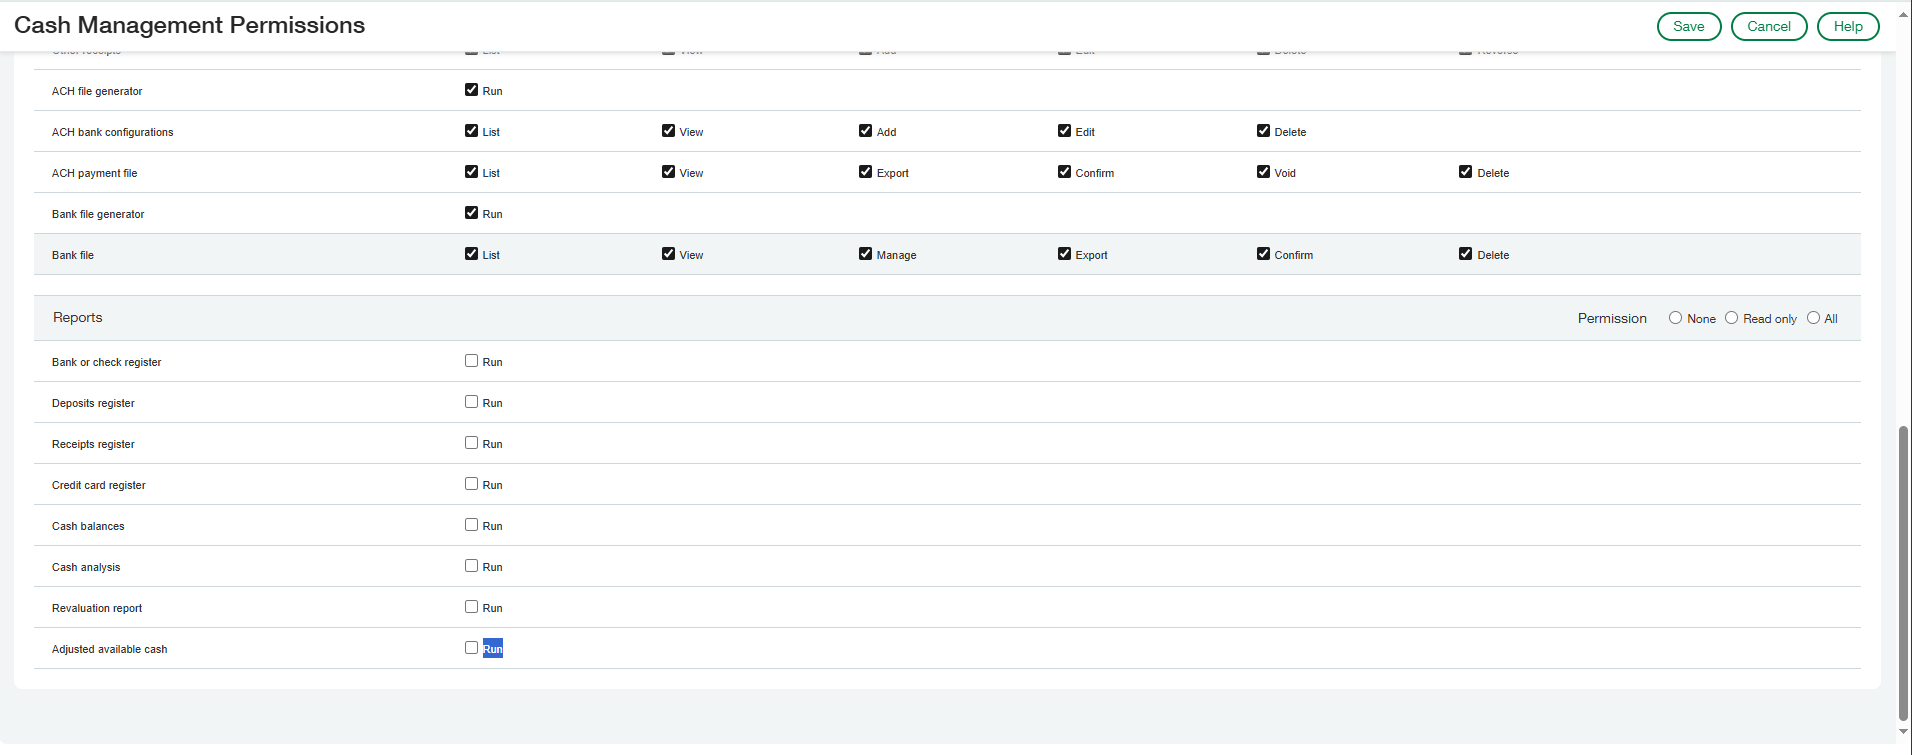
Under Cash Management Permissions select All permissions then Disable the following:
- Rule Set Performance Log-List, View
- Bank/Check Register-Run
- Deposits Register-Run
- Receipts Register-Run
- Credit Card Register-Run
- Cash Balances-Run
- Cash Analysis-Run
- CM Revaluation Report-Run
- Adjusted Available Cash-Run

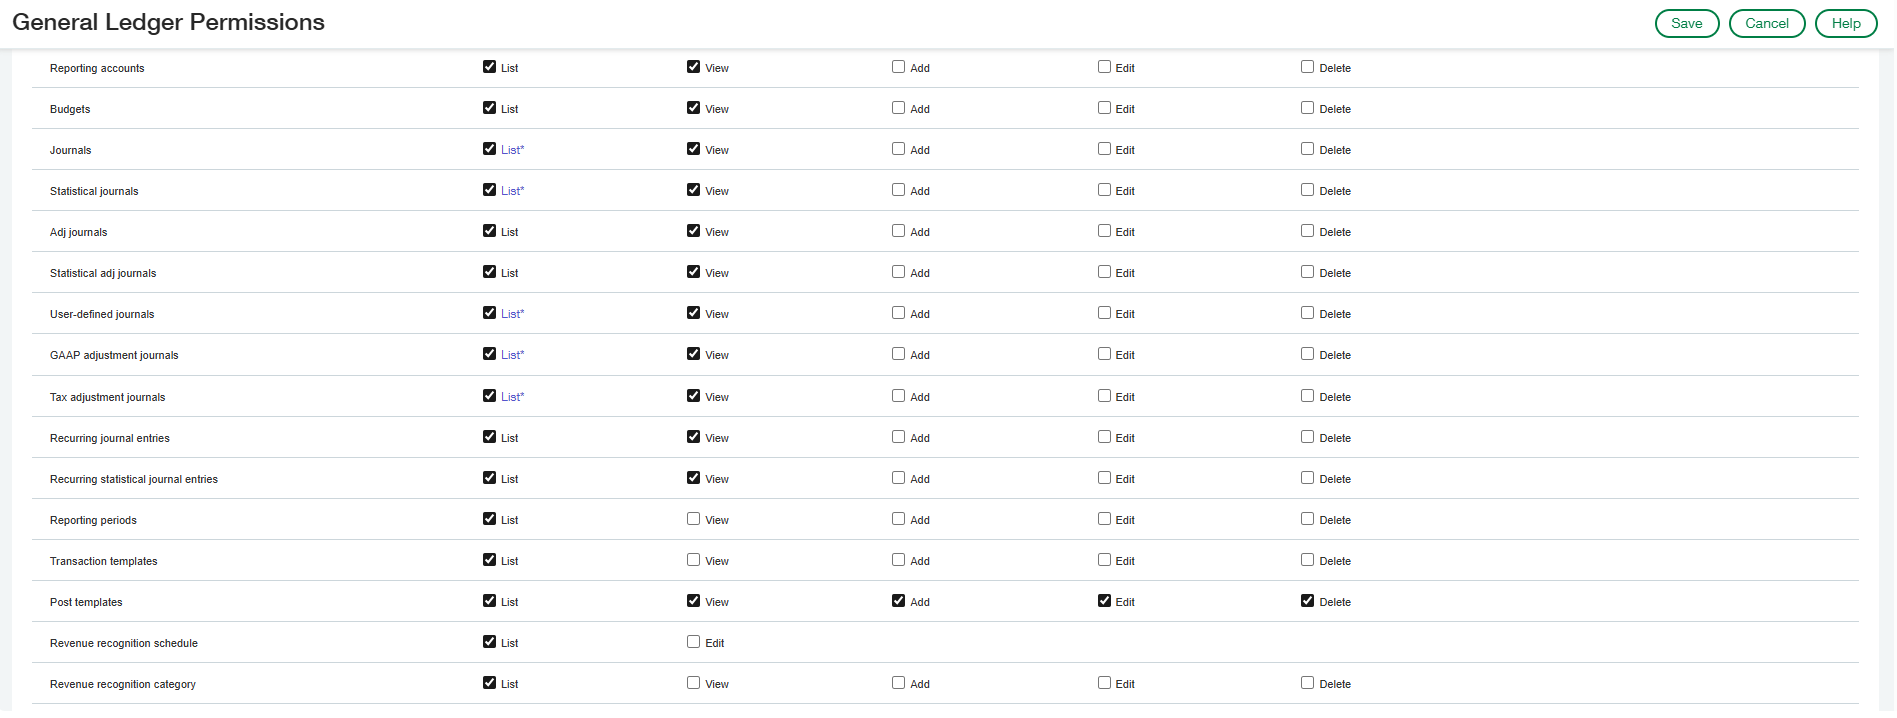
Under General Ledger Permissions select All permissions then Disable the following:
- Journal Entries - Reclass
- Statistical Journal Entries-Reclass
- Adjusting Journal Entries-Reclass
- Statistical Adjusting Journal Entries-Reclass
- User-Defined Journal Entries-Reclass
- GAAP Adjusting Entries-Reclass
- Tax Adjusting Entries-Reclass
- Restriction Release-List, View, Generate, Delete
- Financials-List, View, Add, Edit, Delete
- Trial Balance-Run
- Graphs and Performance Cards-List, View, Add, Edit, Delete
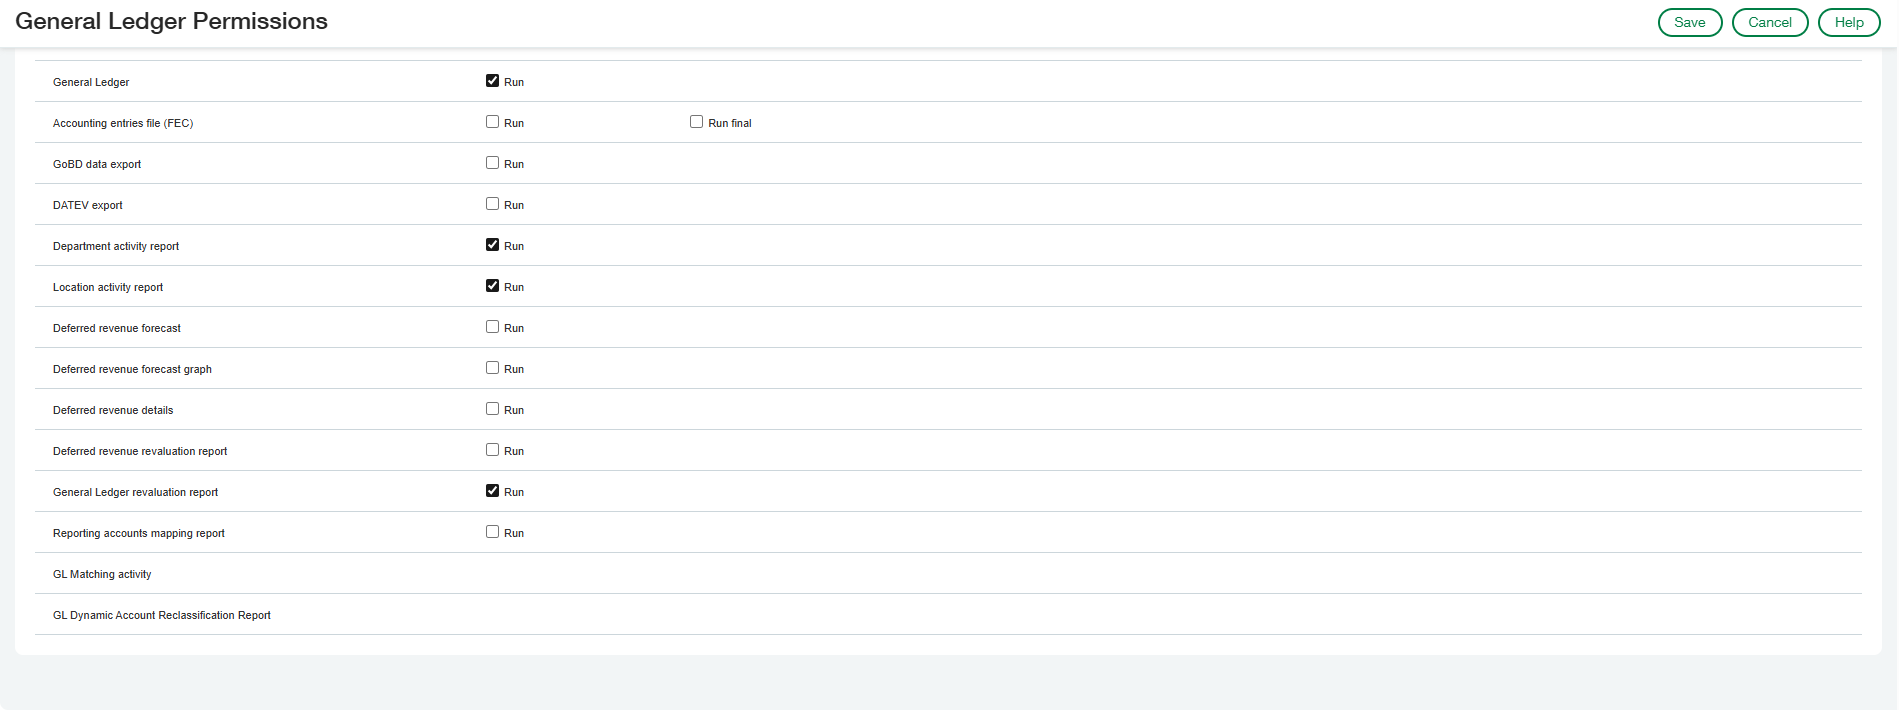
- General Ledger-Run
- Department Activity Report-Run
- Location Activity Report-Run
- Deferred Revenue Forecast-Run
- Deferred Revenue Forecast Graph-Run
- Deferred Revenue Details-Run
- Deferred Revenue Revaluation Report-Run
- General Ledger Revaluation Report-Run


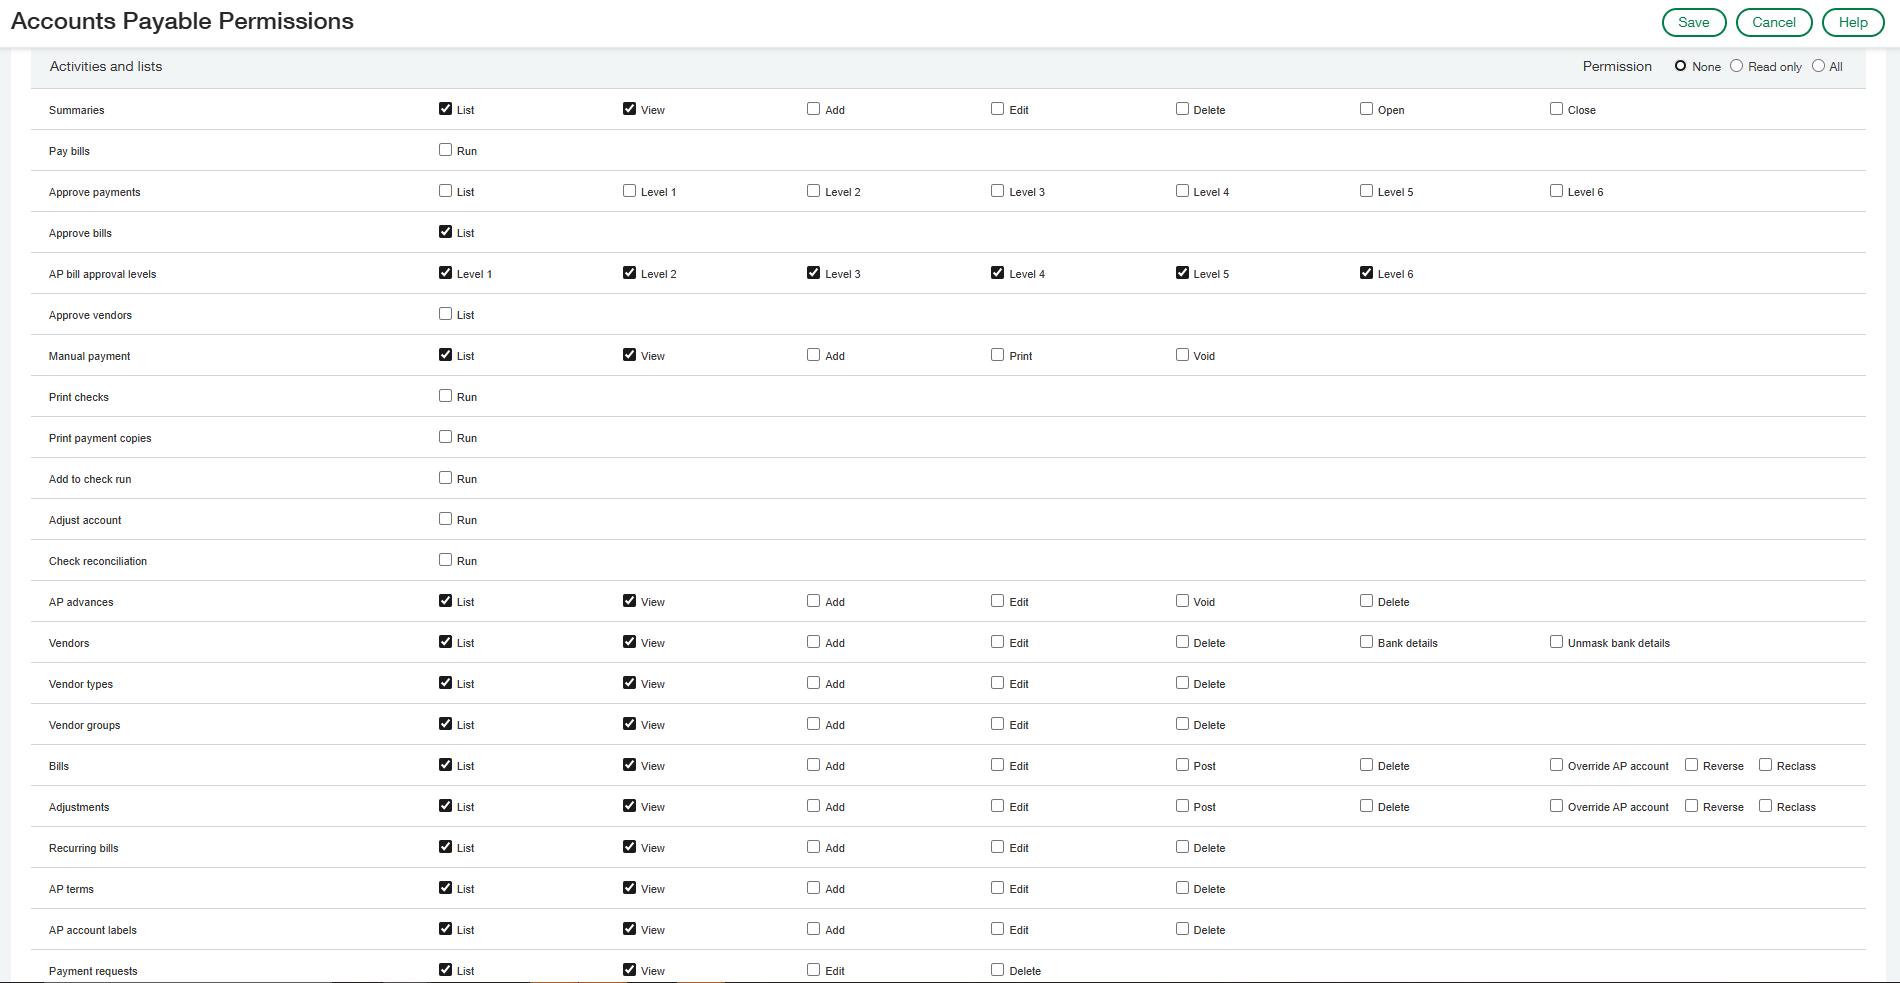
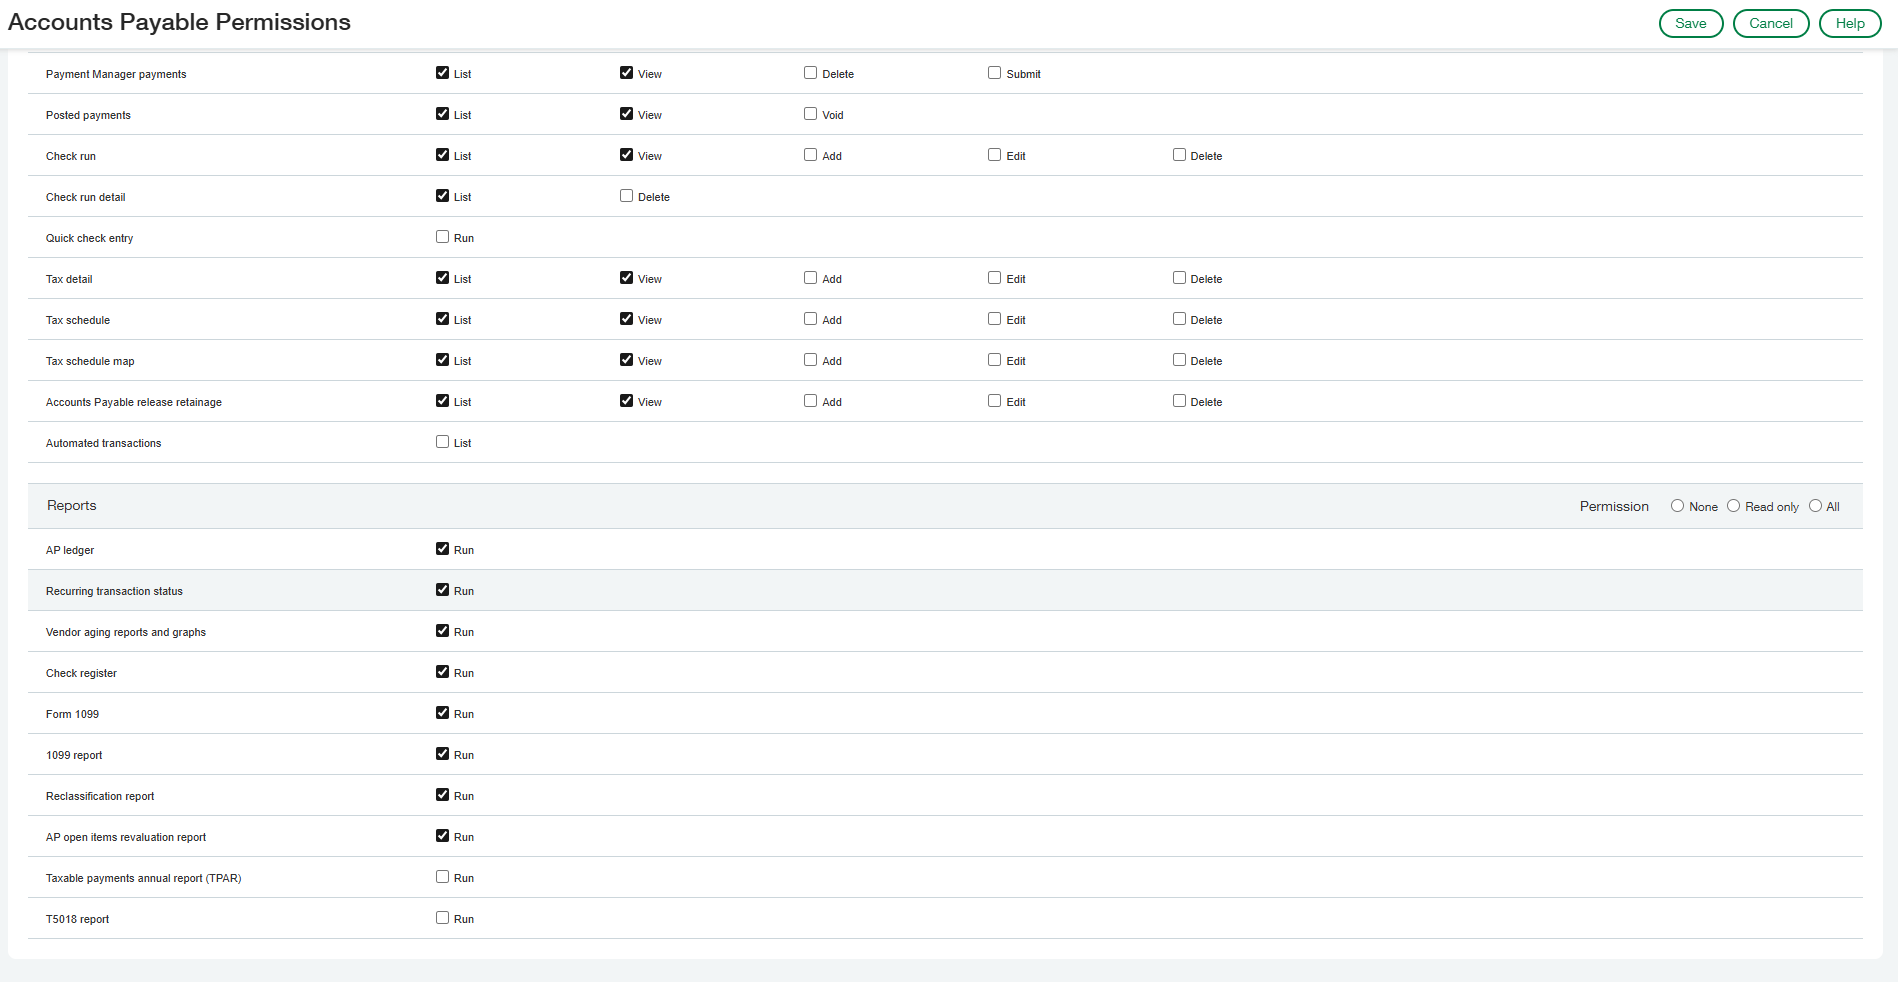
Under Accounts Payable Permissions select All permissions then Disable the following:
- AP Advances-Edit, Delete
- Vendors-Unmask Bank Details
- AP Ledger-Run
- Recurring Transaction Status-Run
- Vendor Aging Reports/Graphs-Run
- Check Register-Run
- Form 1099-Run
- 1099 Reports-Run
- Reclassification Report-Run
- AP Open Items Revaluation Report-Run
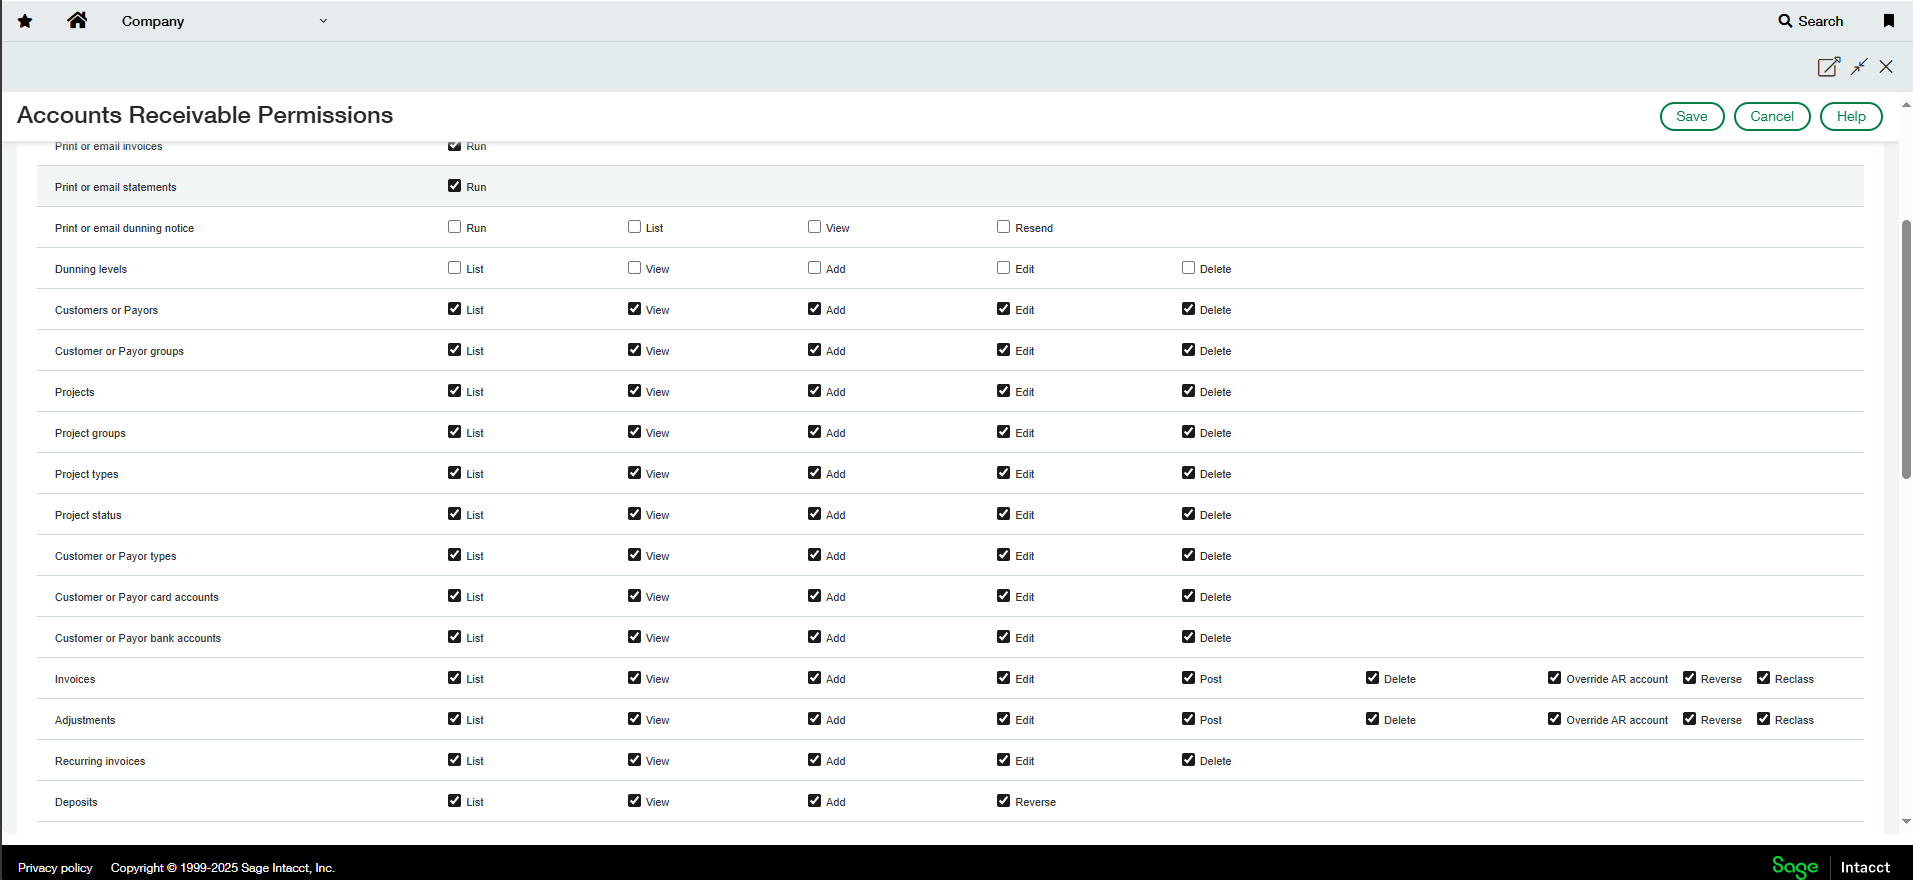
Under Accounts Receivable Permissions select All permissions then Disable the following:
- Print/Email Dunning notice-Run, List, View, Resend
- Dunning Levels-List, View, Add, Edit, Delete
- AR Ledger-Run
- Recurring Transaction Status-Run
- Recurring Transaction Forecast-Run

Was this article helpful?
That’s Great!
Thank you for your feedback
Sorry! We couldn't be helpful
Thank you for your feedback
Feedback sent
We appreciate your effort and will try to fix the article